Usage
Once you have installed the WooCommerce Zapier plugin on your WooCommerce store, configuring your Zaps/integrations (Triggers and Actions) is done via the Zapier.com website.
Make a Zap
Tip
If you haven’t created a Zap before, please refer to Zapier’s key concepts article before proceeding.
To create a WooCommerce Zap, we recommend using one of the Zap templates, as it is typically quicker than hand-crafting your Zap from scratch.
Tip
The actual fields and data can vary depending on the WordPress and WooCommerce versions installed and by installed plugins and settings. If you are using an Actions template, please refresh the fields to make sure everything is updated to match your store.
If you would like to start from scratch, go to your Zapier dashboard page on zapier.com and press the Create Zap button on the left sidebar to set up a new Zap. Alternatively, you can start typing directly on that page.

Authenticate
When you create your first WooCommerce Zap, you will be asked to choose your WooCommerce account.
The authentication process involves the Zapier.com service connecting to your WooCommerce store using your WordPress administrator username and password.
Please ensure you complete the authentication dialogue window correctly:
- In the WordPress Site Address (URL) field, enter the URL to your WordPress website’s home (front) page. Be sure the URL starts with
https://and does not include the trailing slash.
For example:https://example.com
If in doubt, go to the WordPress Dashboard → Side Menu → Settings → General screen and copy the Site Address (URL) field value and paste it into the WordPress Site Address (URL) field in the authentication dialogue window. - In the WordPress Username field, enter your administrator username or email address that you use when logging into the WordPress dashboard.
-
In the WordPress Application Password field, create an Application Password for your WordPress administrator account, and enter it here.
Use a WordPress Application Password
Using an application password (rather than your regular password) improves compatibility with security-related plugins and services. See details in the Security Plugins chapter.
To set up an Application Password, go to WordPress Dashboard → Side Menu → Users → Profile screen and press the “Add New Application Password” button. Please see here for details.
Can’t see the Application Passwords settings in WordPress? Please see here for suggestions.
Alternatively, if you are unable to create an Application Password, you can use your regular WordPress password.
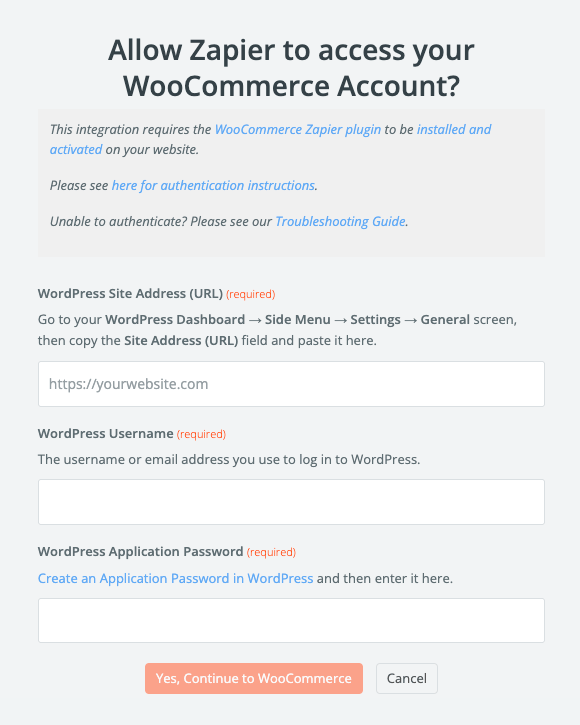
Click the Yes, Continue button to complete the process.
Congratulations, you have successfully authenticated!
What’s next?
- If you would like to send WooCommerce data to your Zap, please continue to the Trigger chapter.
- Alternatively, if you would like to create new (or update existing) WooCommerce data from your Zap, please go to the Action chapter.
Note
If you encounter issues while authenticating, please refer to our Troubleshooting Authentication Errors documentation.
Trigger (Outgoing Connection)
This feature allows you to send WooCommerce data to a Zapier Zap.
Step 1: Trigger step
- In the Choose App & Event step, search for the WooCommerce app and click it.
-
Select the Resource (data type) in the Choose Trigger Event dropdown – for example, Order if you would like to send WooCommerce orders to Zapier.
-
In the Choose Account step, click on the Sign in to WooCommerce button to authenticate your Zapier account with your WooCommerce store.
If you are already authenticated, you can choose the previously used authentication from the WooCommerce account dropdown menu instead.Note
Use the WordPress Application Password feature to authenticate.
If you encounter issues while authenticating, please refer to our Troubleshooting Authentication Errors documentation.
-
The Customise…1 step
- Select a Trigger Rule from the Trigger Rule dropdown to choose which event starts your zap. For example, Order created. See here for details on which Trigger Rule to use.
-
In the Find Data step, click the Test & Continue button to retrieve sample data from your WooCommerce store.
Find Data
When retrieving sample data from your store, it isn’t contextual to the Trigger Rule you have chosen for the Zap. Find Data simply retrieves your most recent store data (regardless of status) when getting sample data.
However, once you turn on your Zap, the trigger rule will apply and should only send relevant data to Zapier.
Step 2: Action step
- In the Choose App & Event step, choose a service to send your WooCommerce data to.
- Finish configuring the Action step. Please see Zapier’s instructions on setting up your Zap action for more details.
Step 3: Finishing Zap
- Optionally Customize your Zap
- You can Name your Zap
- Don’t forget to Turn on (publish) your Zap
Transferring Existing Data
Once your Zap is published, it will operate on data that is added or changed from that point forward.
If you need to process existing data through your Zap, you can transfer your existing data using your new Zap.
Tip
To ensure reliable and timely delivery of your WooCommerce data to Zapier, we recommend setting up a server cron job.
Action (Incoming Connection)
Actions allow you to create new (or update existing) WooCommerce data from a Zapier Zap.
Step 1: Trigger steps
- In the Choose App & Event step, choose a service to get the source data from.
- Finish configuring the Trigger.
Step 2: Action steps
- In the Choose App & Event step, select the WooCommerce app.
-
Choose the Action in the Choose Action Event dropdown – for example, Create Order.
-
In the Choose Account step, click on the Sign in to WooCommerce button to authenticate your Zapier account with your WooCommerce store.
If you are already authenticated, you can choose the previously used authentication from the WooCommerce account dropdown menu instead.Note
Use the WordPress Application Password feature to authenticate.
If you encounter issues while authenticating, please refer to our Troubleshooting Authentication Errors documentation.
-
The Customise…1 step
- Fill in all of the WooCommerce input fields that you want to send data to. You can choose data fields from the Trigger part of your Zap, or you can type in hard-coded values.
- In the Send Data step, click the Test & Continue button to finish the Action configuration.
Step 3: Finishing Zap
- Optionally Customize your Zap
- You can Name your Zap
- Don’t forget to Turn on (publish) your Zap
Transferring Existing Data
Once your Zap is published, it will operate on data that is added or changed from that point forward.
If you need to process existing data through your Zap, you can transfer your existing data using your new Zap.
Tip
To ensure reliable and timely delivery of your WooCommerce data to Zapier, we recommend setting up a server cron job.
Create a Resource
This feature allows you to create new data in WooCommerce from a Zapier Zap. For example, you could create a Zap that creates a new Customer in WooCommerce whenever they subscribe to your mailing list.
Configure your Zap as seen in the Create an Action chapter above, and in the Choose Action Event dropdown select the corresponding Create Action.
The Zapier Integration (and WooCommerce itself) is quite relaxed when creating a new Resource. You can create orders, products, and subscriptions5 without any input, but that’s probably not what you want.
- For the Create Coupon action, you must provide at least the Coupon code.
- For the Create Customer action, you must provide at least the Customer email address.
The required fields are clearly labelled in the Zapier interface.
Tip
For more details on each data field, please consult the relevant Field Definitions documentation.
Update a Resource
This feature allows you to update existing data in WooCommerce from a Zapier Zap. For example, you could create a Zap that updates the inventory (stock) level of a WooCommerce product using Zapier.
If you know the ID of a WooCommerce Resource (for example coming from a previous step), you can update that resource with the new Update Action.
Configure your Zap as seen in the Create an Action chapter above, and in the Choose Action Event dropdown select the corresponding Update Action.
Note: Resource ID is Required for Update Steps
An update action always requires a valid top-level ID to be specified. This ensures that your Zap knows which record to update. On the other hand, any non-top-level ID is optional. If you leave it empty, WooCommerce will create a new entry, such as a new Meta Data item.
To help identify the correct Resource ID, you can add a Find step before your update step. The result of your Find step will contain the Resource ID, which you can then use in the Update step.
Tip
For more details on each data field, please consult the relevant Field Definitions documentation.
Find a Resource (Search)
This feature allows you to search for existing WooCommerce data from a Zapier Zap. For example, you could search for a product based on its SKU before updating it in WooCommerce.
Configure your Zap as seen in the Create an Action chapter above, and in the Choose Action Event dropdown select the corresponding Find Action.
After finding a Resource you can immediately create one if it is not found. This is a great way to implement synchronisation functionality between two apps using Zapier.

Alternatively, after searching you can add an additional step2 to your Zap to use the found Resource/data.
Tip
See the Product Types chapter for a full list of supported WooCommerce product types and functionalities.
For more details on each data field, please consult the relevant Field Definitions documentation.
Meta Data (Custom Fields) 
WooCommerce is designed to be flexible and extensible. Part of this extensibility is a meta data capability, which extensions/plugins can use to store their additional information/data.
For example, whenever an order is created in WooCommerce, information is often stored in the order’s meta data. Payment gateways (such as Stripe) will often store their fee and/or net revenue information in Order Meta Data.
Moreover, if you are using Custom Fields in your store, then they will typically be stored in meta data also.
In the context of WooCommerce Zapier and your Zaps, the meta data that is available for use in your Zaps is as follows:
- Coupon Meta Data
- Customer Meta Data
- Order Meta Data
- Order Coupon Lines Meta Data
- Order Fee Lines Meta Data
- Order Line Items Meta Data
- Order Shipping Lines Meta Data
- Order Tax Lines Meta Data
- Product Meta Data
Using in Triggers and Searches
WooCommerce meta data is automatically expanded into individual fields to make them more accessible and usable in subsequent steps in your Zaps. Furthermore, for Create… Actions a list of fields is provided for adding multiple meta data records during creation.
For example, if an Order has a stripe_fee meta data field, you can access it using the Meta Data Stripe Fee field in Zaps.
Important
Several caveats apply when using Meta Data in your Zaps:
- Meta Data fields in WooCommerce are unstructured and typically vary from one resource to another.
For example, if multiple payment gateways are used, one order may contain a specific meta data field (key), however, another order may not. This means a meta data field(s) can be missing or can be different in each task. Consider adding a Path or Filter step to your Zap, to conditionally perform separate actions depending on which Meta Data fields exist. - WooCommerce meta data fields can have multiple values for a single key. In this case, the last meta data value for that key is the one that is used in Zaps. i.e. the first value is overwritten by the second value.
- The existing Meta Data, Meta Data Key and Meta Data Value fields are still present for backward compatibility reasons, however, we do not recommend using these.
When creating or configuring your Zap, the sample data chosen in the Find Data step in your trigger needs to contain the meta data fields that you would like to use in your Zap.
This makes it much easier to complete your Zap setup because the fields will be available in your Action step(s) in your Zap.
Using in Actions (Creates)
In Create Actions, you will see a Meta Data List input section, and the Meta Data input fields are labelled as “Legacy”:

The Meta Data List input field lets you add (set) multiple meta data records at once.
- In the left-hand field, enter the name (key) of the meta data record you would like to add.
- In the right-hand field, enter the desired value for the meta data field (you can also use template variables from previous steps when setting the value).
- If you would like to add/set multiple meta data records, click the plus icon () and fill in that key and value also.
The Meta Data (Legacy) fields aren’t typically used, as we recommend using the newer Meta Data List input fields instead.
Transfer Existing Data Using a Zap
Zapier also allows you to transfer your existing data from one app to another, moving data in bulk.
After setting up your Zap (and having it trigger from only that point onwards), you can also use the Transfer existing data option to move/send data in bulk.
You can use it to move WooCommerce data in bulk from WooCommerce to another app of your choosing. Or you can use it to bulk move data from other apps into WooCommerce.
See here for a great summary of this feature.
Use Cases
Below are some examples of what you can achieve using this feature.
Bulk Exporting WooCommerce Data
You can use WooCommerce Zapier to bulk export WooCommerce data to another app.
- Bulk Export Orders from WooCommerce
- Bulk Export Products from WooCommerce
- Bulk Export Customers from WooCommerce
- Bulk Export Coupons from WooCommerce
- Bulk Export Bookings from WooCommerce
- Bulk Export Membership Plan from WooCommerce
- Bulk Export User Membership from WooCommerce
- Bulk Export Subscriptions from WooCommerce
This is particularly useful if you ever change one of your underlying systems. For example, if you change your CRM to a new system, you can bulk import WooCommerce data into your new system.
Bulk Importing Data Into WooCommerce
You can use WooCommerce Zapier to bulk import data from another app into WooCommerce:
- Bulk Import Orders into WooCommerce
- Bulk Import Products into WooCommerce
- Bulk Import Customers into WooCommerce
- Bulk Import Coupons into WooCommerce
- Bulk Import Subscriptions into WooCommerce
Usage
Please consult the following articles for detailed instructions:
WooCommerce as a Source
When using WooCommerce as a source, all WooCommerce Triggers are available for use.
You select your nominated WooCommerce trigger resource, then configure your destination action and map fields, similar to how you map fields in the Zap Editor interface.
Zapier will then retrieve all of your WooCommerce data and display it in the interface.
Info
It may take some time to retrieve all existing data from your WooCommerce store. Please be patient while data is retrieved.
You can then filter and/or search your WooCommerce data, and tick the record(s) that you would like to send to your destination app.
This allows you to easily select all (or some) of your existing WooCommerce data with a few clicks.
WooCommerce as a Destination (Action)
If using WooCommerce as a destination (action), you can send data from any of Zapier’s supported source apps, and send that data to WooCommerce.
All existing WooCommerce Actions are available for use.
Advanced Zaps
In a Zap you can have additional steps between the Trigger and Action steps:
- Use a Find step to access additional data.
- Use the Filter or Paths built-in apps to implement advanced logic or support multiple outputs.
- Use the Formatter built-in app to transform field values.
- Use the Code built-in app to transform data structures, or calculate new fields.
Note
Multi-step Zaps require a paid Zapier account2. You can add multiple steps in a Zap to combine individual functionalities.
Find Steps
For accessing additional data in your Zap, you can add a Find step between your Trigger and Action steps in your Zap configuration.
You can see a list of available search (find) actions in the Actions and Searches documentation.
Finding Products from Orders
Tip
See the Product Types chapter for a full list of supported WooCommerce product types and functionalities.
If you are using one of the Order Triggers, and want to use the line item product category (or tag) in a subsequent action step as well, you can create a Zap that utilises a Find Product step.
There are two separate ways to implement this, depending on which Trigger you are using:
Line Item in an Order → Find Product
If you are using the Line Item in an Order trigger, you can configure your Zap like this:
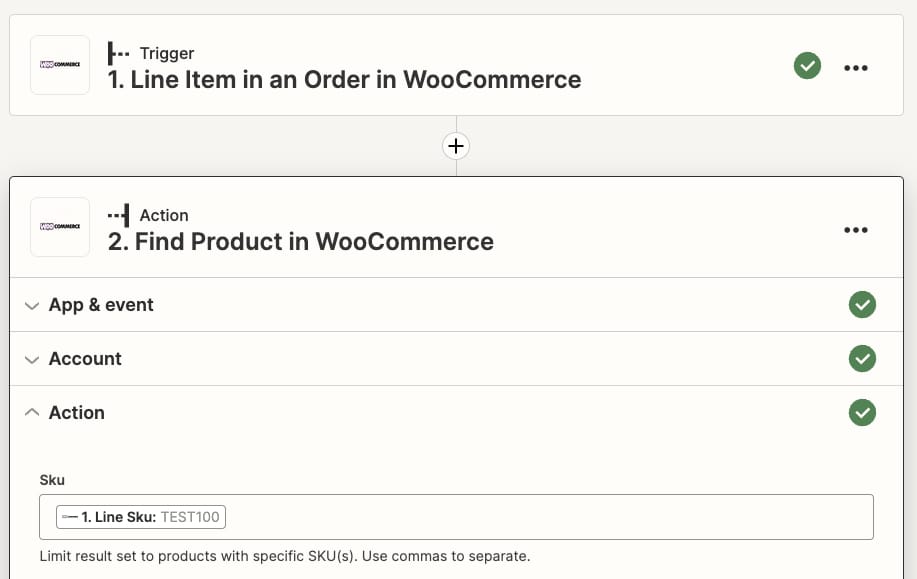
Ensure you are using a Line Item in an Order step as Step 1, then add a Find Product action as Step 2.
If your store uses product SKUs, choose to search by SKU, and insert the Line Product SKU field from Step 1 into it. This instructs the Find Product step to search using the correct (unique) product SKU from the order’s line item.
If your store does not use product SKUs and uses a mix of simple and variable products, then it will not be possible to use a single Find Product step to search for the product or variation due to the way the WooCommerce Order Line Item stores the Product ID and Variation ID in different fields. Instead, we highly recommend adding SKUs to all of your products and variations and then using a Find Product Step to search by SKU.
In step 3 of your Zap (the action) you can utilise the categories → name (or tags → name) array which you can then use in the next step of your Zap.
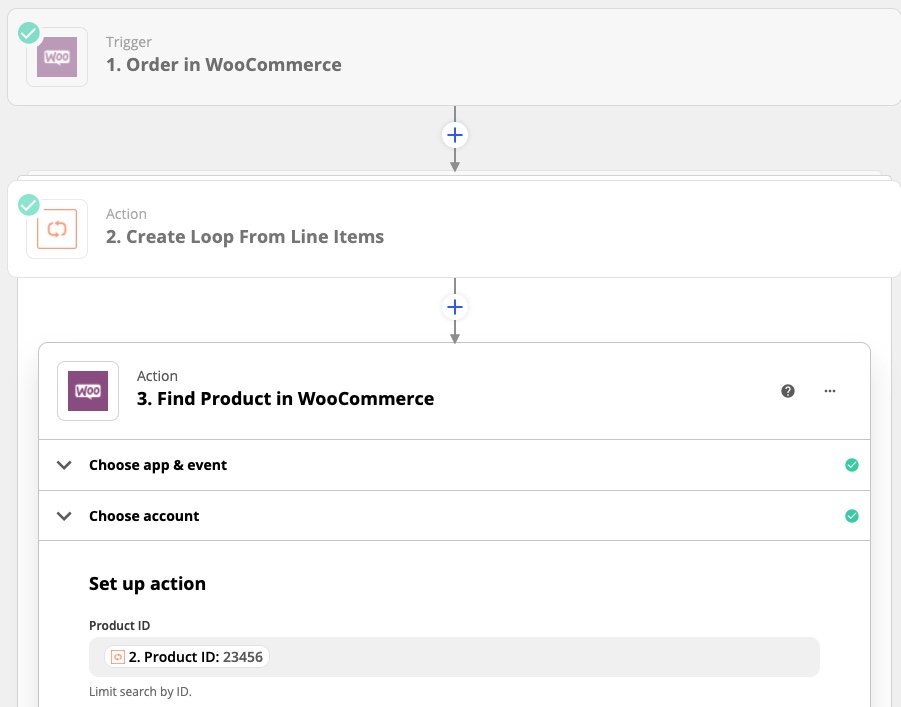
Order → Looping by Zapier → Find Product
If you are using the Order trigger, an alternative approach is to use a Looping by Zapier step in your Zap like this:

Please see the Looping by Zapier chapter below for more details.
Filter by Zapier
Filter by Zapier allows you to add special conditions to Zaps. For example, using a filter you could configure a Zap to:
- act only on orders for a specific product category
- act only on orders that exceed a specified order value
- act only on orders that are to be shipped to a specific country
Please see Zapier’s help articles for more information on how to use filters in your Zaps.
Paths by Zapier
Paths by Zapier allows you to add branching logic to Zaps. The main advantage of using Paths is that you can create up to three different outputs (paths) within a single Zap.
Please see Zapier’s help article for more details.
Looping by Zapier
Adding a Looping by Zapier action to your Zap lets you perform your desired action more than once per Zap. This is particularly useful with WooCommerce Order triggers, which have multiple line items.
Typically, you would use the Create Loop From Line Items option, with a configuration like this:
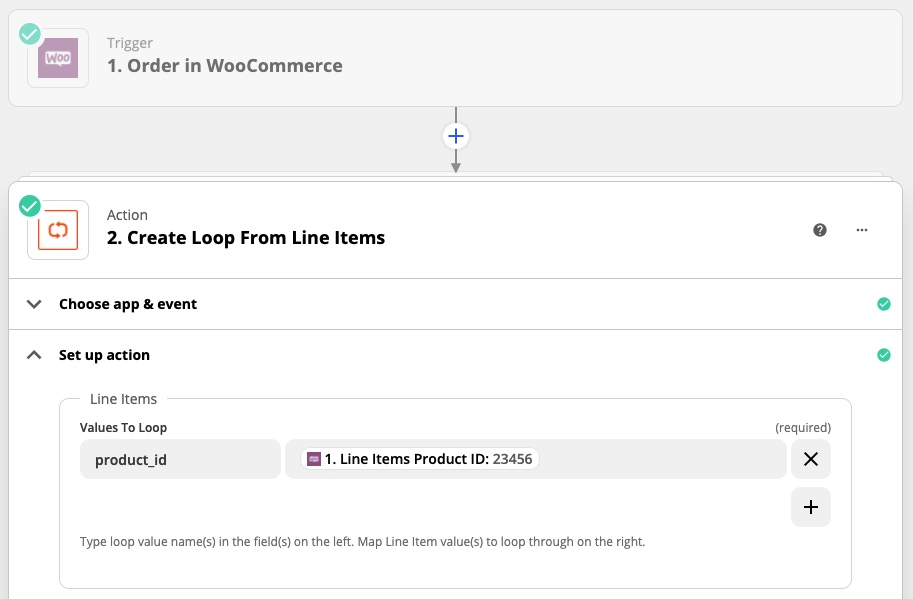
Which would allow you then use the 2. Product ID field in a subsequent step (such as a Find Product step):
Please see Zapier’s help article for more details on how to use Looping by Zapier.
Warning
Looping by Zapier is currently a Beta Zapier app and is subject to change.
Formatter by Zapier
With Formatter by Zapier, you format data in Zaps. For example, you can split or combine field contents, convert between different number or date formats, or even transform the whole data structure.
Please see Zapier’s help article for more details.
Line Itemizer
Various parts of WooCommerce Zapier require line-item-enabled data sources. See the Actions and Searches chapter for a full list of these fields.
The Line Itemizer transform in the Formatter by Zapier app allows you to easily convert comma-separated text or values into line items that can be used in WooCommerce Zapier Actions.
An Example: Adding Multiple Product Attributes to a Product
The Line Itemizer transform can be used to generate multiple product attributes that are used as part of a Create Product or Update Product action to add multiple Product Attributes to a WooCommerce Product.
In WordPress, go to WordPress Dashboard → Side Menu → Products → Attributes, to see the list of store-wide Product Attributes.
On that screen, hover over one of the attributes you’d like to use and then click on Edit to edit that attribute. Your browser URL bar will show something similar to /wp-admin/edit.php?post_type=product&page=product_attributes&edit=123. Make a note of the edit=123 part of that URL. This part tells you the attribute’s ID (in this example, it is 123).
Repeat the above process for all attributes that you would like to use in your Zap.
Return to your Zap Editor, and before your WooCommerce Create Product or Update Product action, add a new Formatter by Zapier → Line Itemizer step.
In the Set up action step, enter Attributes into the Line-item(s) Group Name field.
In the Line-item Properties section, type id in the left field, then add another row and type value:
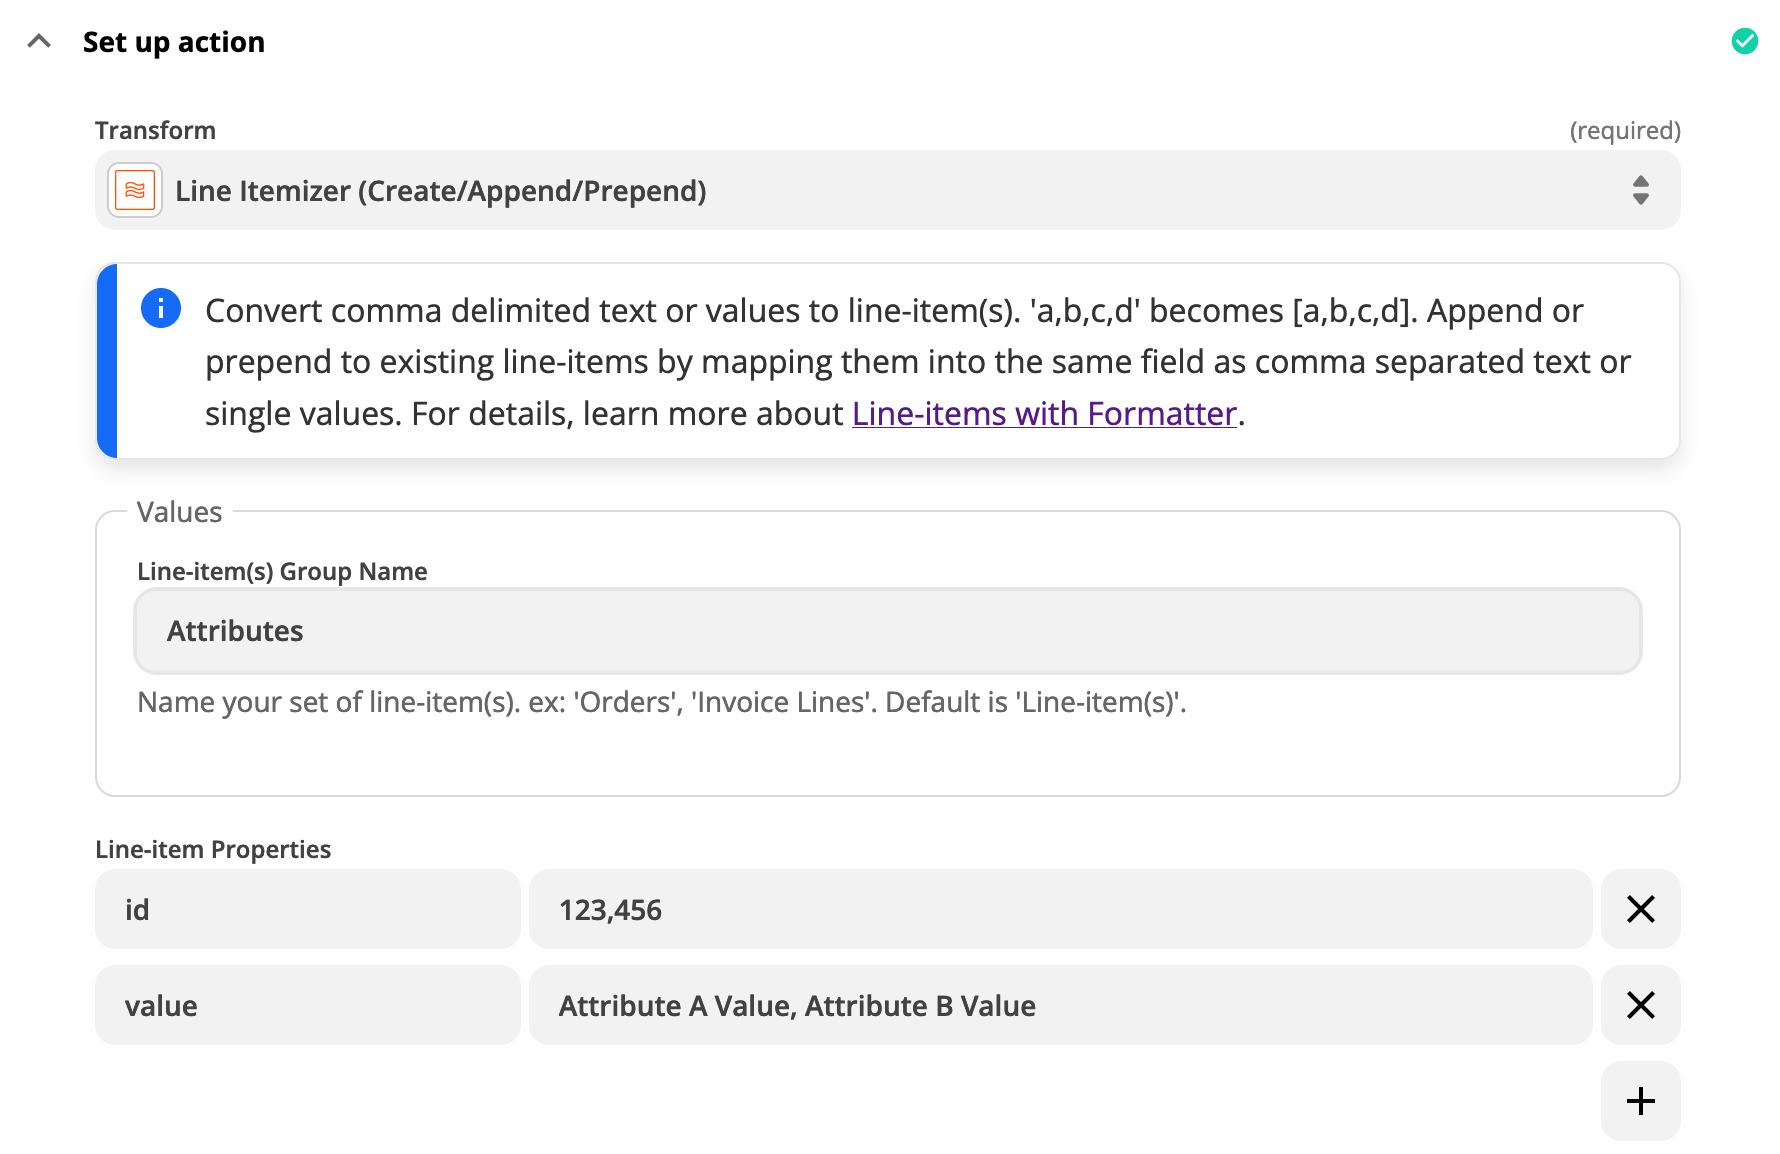
The right-hand id field will be a comma-separated list of Attribute IDs for your store that you would like to assign to the product.
The right-hand value will be a comma-separated list of Attribute Values for the above Attribute IDs. Typically, this field won’t have manually typed values, it will instead have a comma-separated list of actual values from Step 1 of your Zap.
The output of this new Formatter step will be an array (list) of attribute IDs and their values.
You then pass that output to your Create Product or Update Product step by editing your Create Product or Update Product step and configuring it similarly to this:
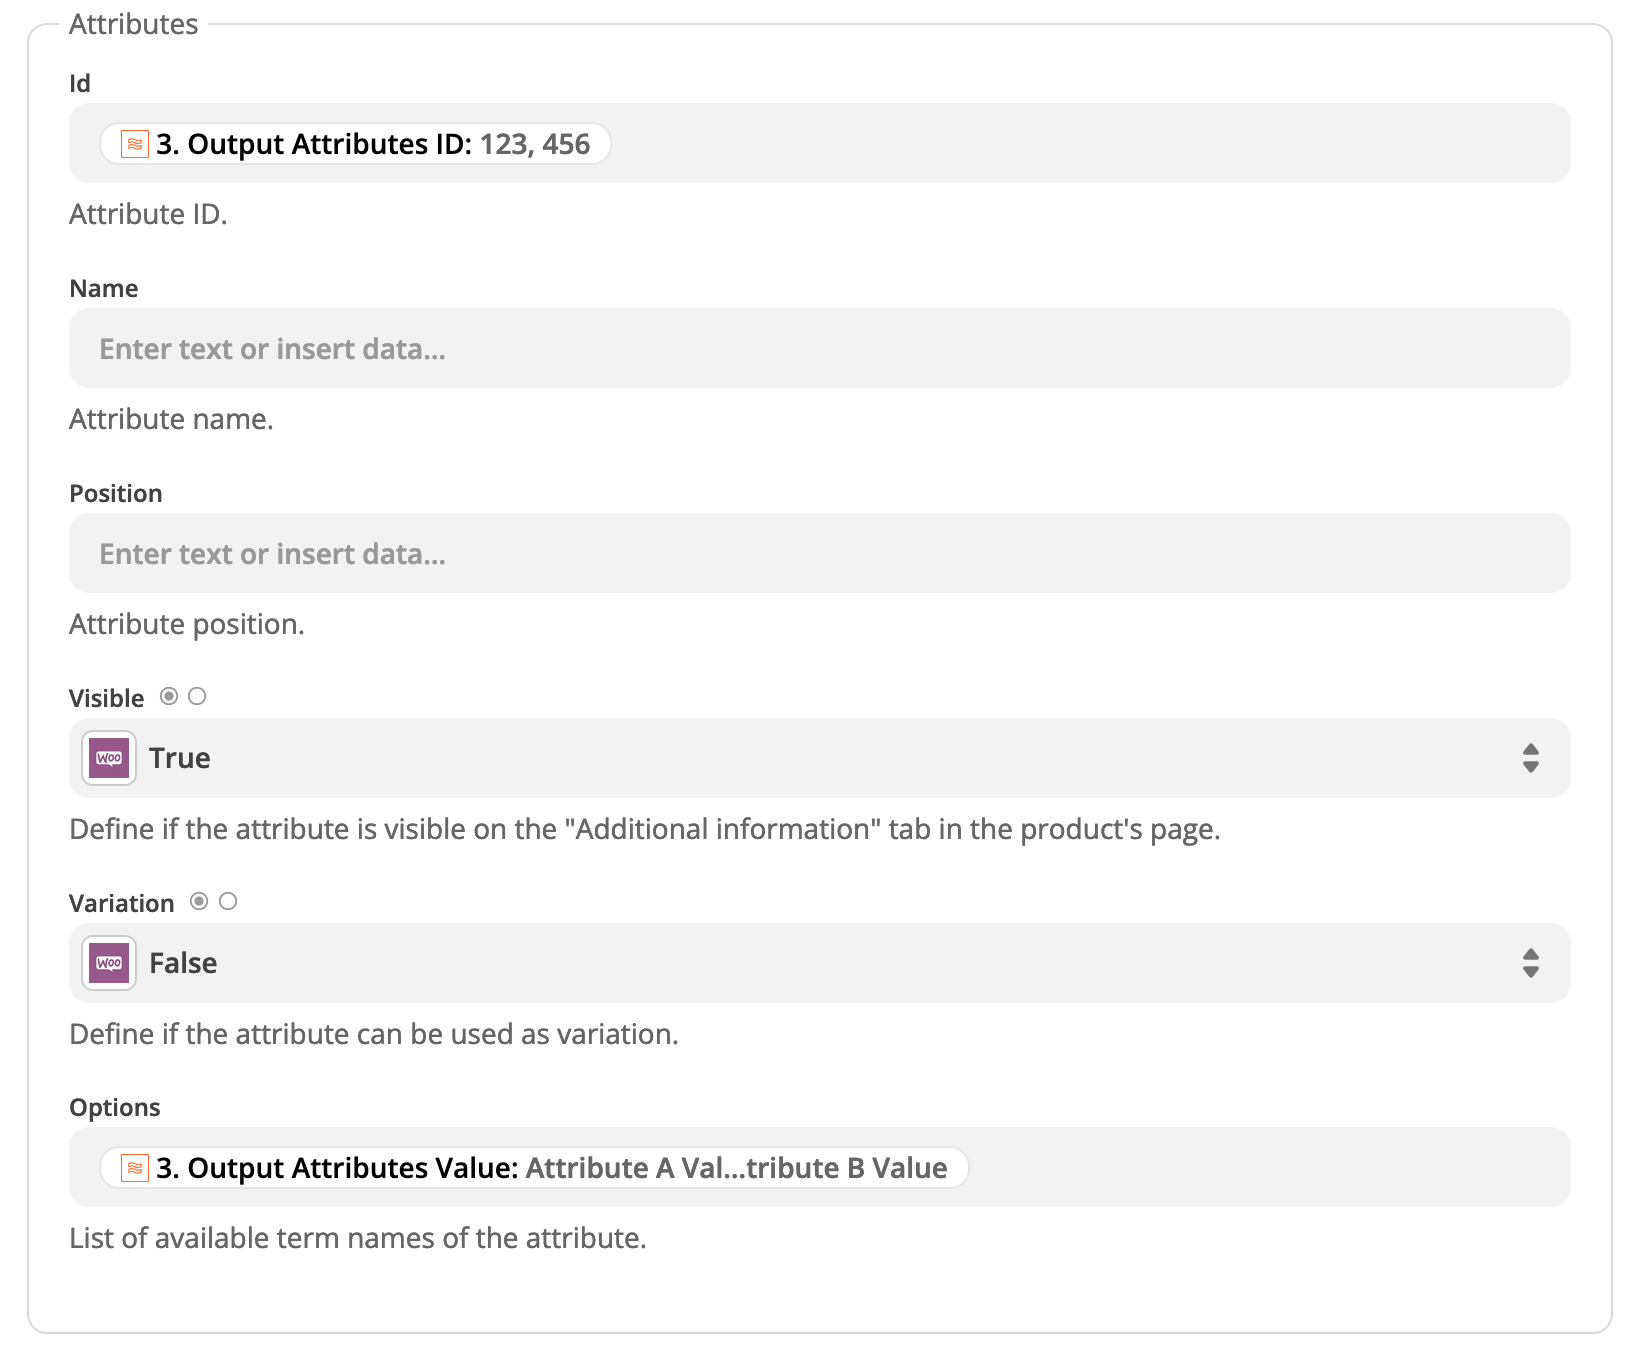
When your Create Product or Update Product step executes, it will “loop” over each item in the attributes list, and send them all to WooCommerce when creating/updating the product.
The result should be a product in WooCommerce that has multiple attributes and values assigned to it.
This same technique can be used for any other line-item aware field in WooCommerce Zapier. See the Actions and Searches chapter for a full list of these line-item-enabled fields.
Code by Zapier
By adding the Code by Zapier step to your Zap, you can add fields based on the trigger data. For example, you can restructure, simplify or calculate new values. The output can be usable in the subsequent steps.
Please see Zapier’s help article for more details on how to use Javascript code in your Zaps.
Below are some examples of what you can achieve using a Code by Zapier step.
Heads Up
The following code snippets are provided as examples only.
We are unable to provide support for writing custom code, so you may need to enlist the support of a Certified Zapier Expert or Web Developer.
Add “Line Items Count” Field to an Order
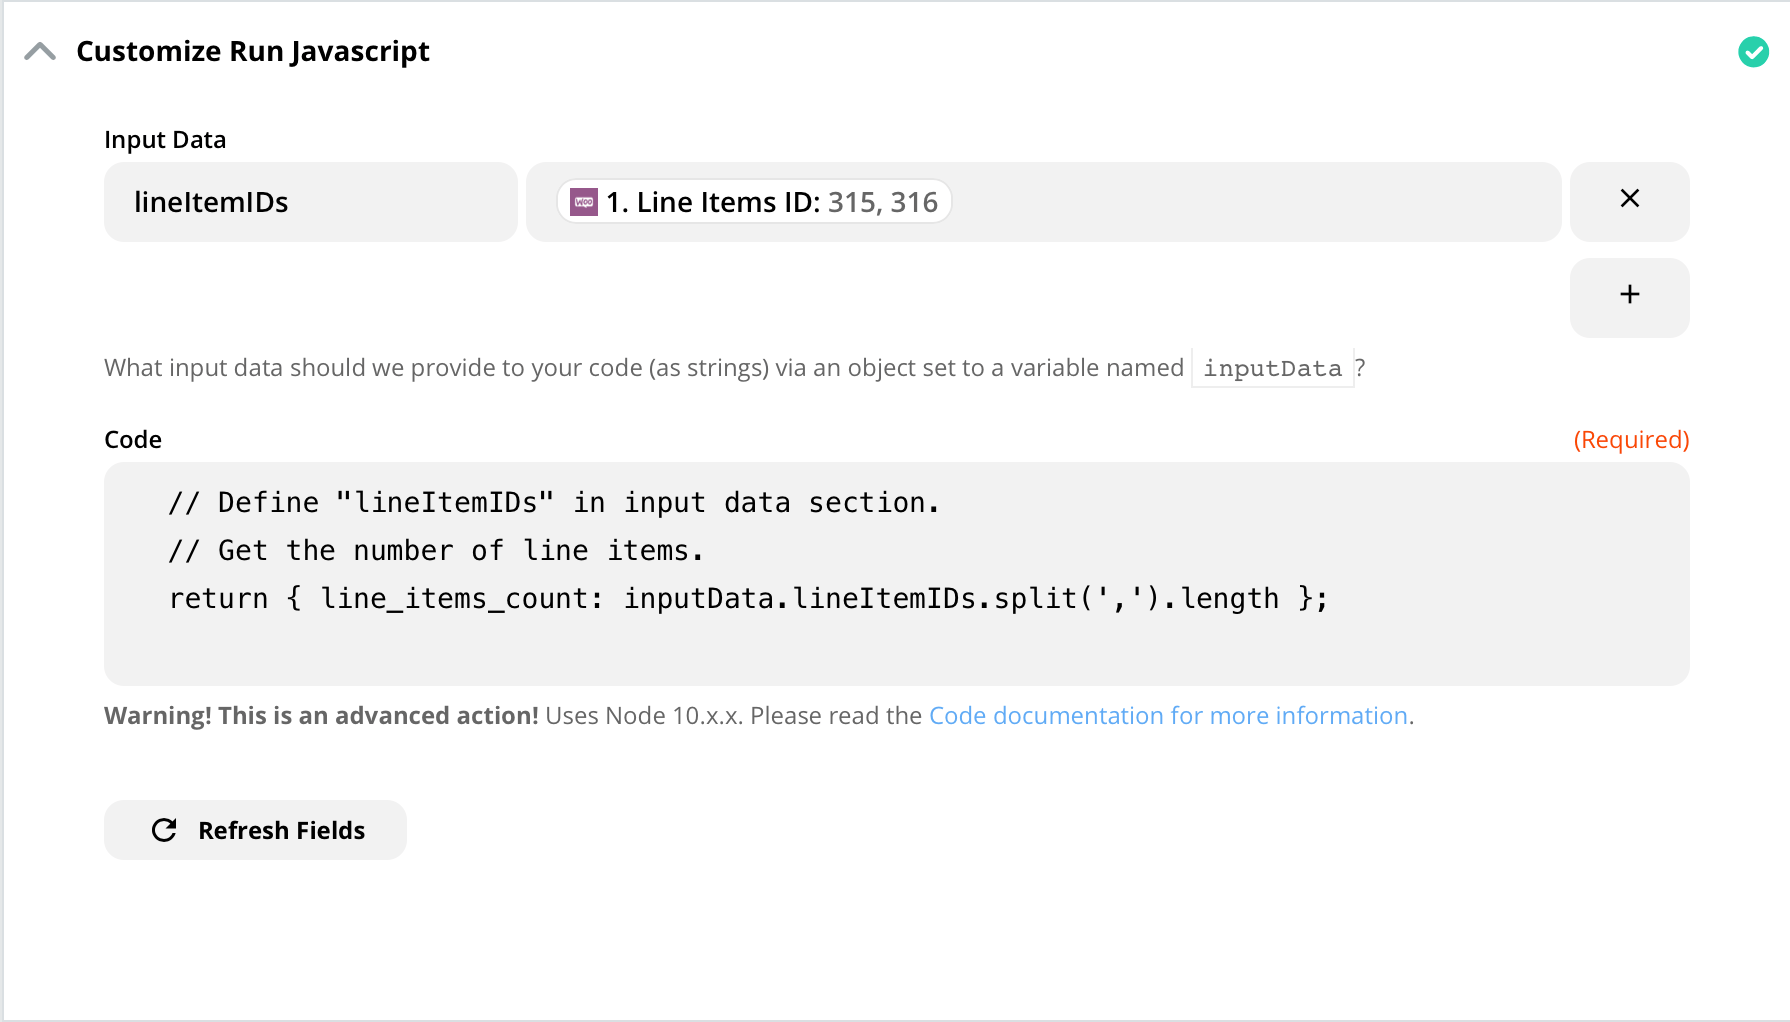
// Define "lineItemIDs" in the Input Data section.
// Get the number of line items.
return { line_items_count: inputData.lineItemIDs.split(',').length };
- Add a Code by Zapier step to your Zap and choose Run Javascript for the Event Action.
- Define
lineItemIDsby choosing the 1. Line Items ID in the Input Data section. - Copy the above code snippet and paste it into the Code section.
The step should look like this:
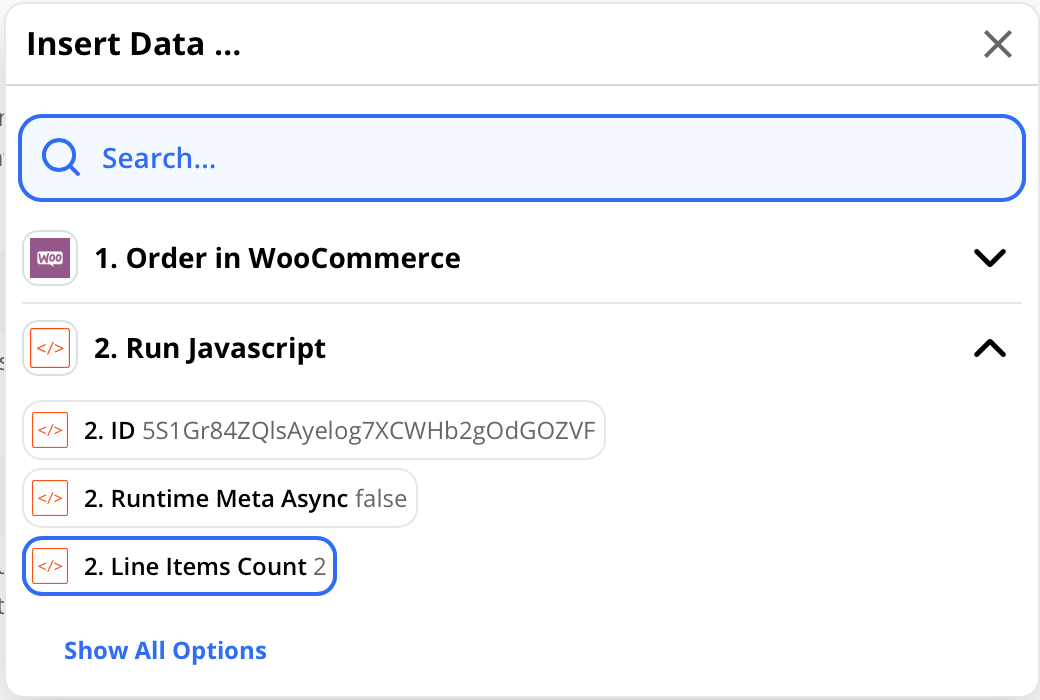
The result would show in the subsequent steps like this:
Add Meta Data Fields to a Trigger 
Heads Up
Looking for the meta data code example? Individual meta data fields are now accessible without needing to add a Code by Zapier step. Please see here for more details.
Performing Different Actions For Different Products Ordered
Each Zap that uses the Order trigger will apply to all orders (and thus all products) by default, however, it is possible to perform different actions based on the product ordered.
To set this up, we recommend using the Line Item in an Order trigger (instead of the Order trigger) because the Line Item in an Order trigger fires individually for each individual line item ordered, rather than firing only once per order. This allows you to automate based on the individual product(s) ordered.
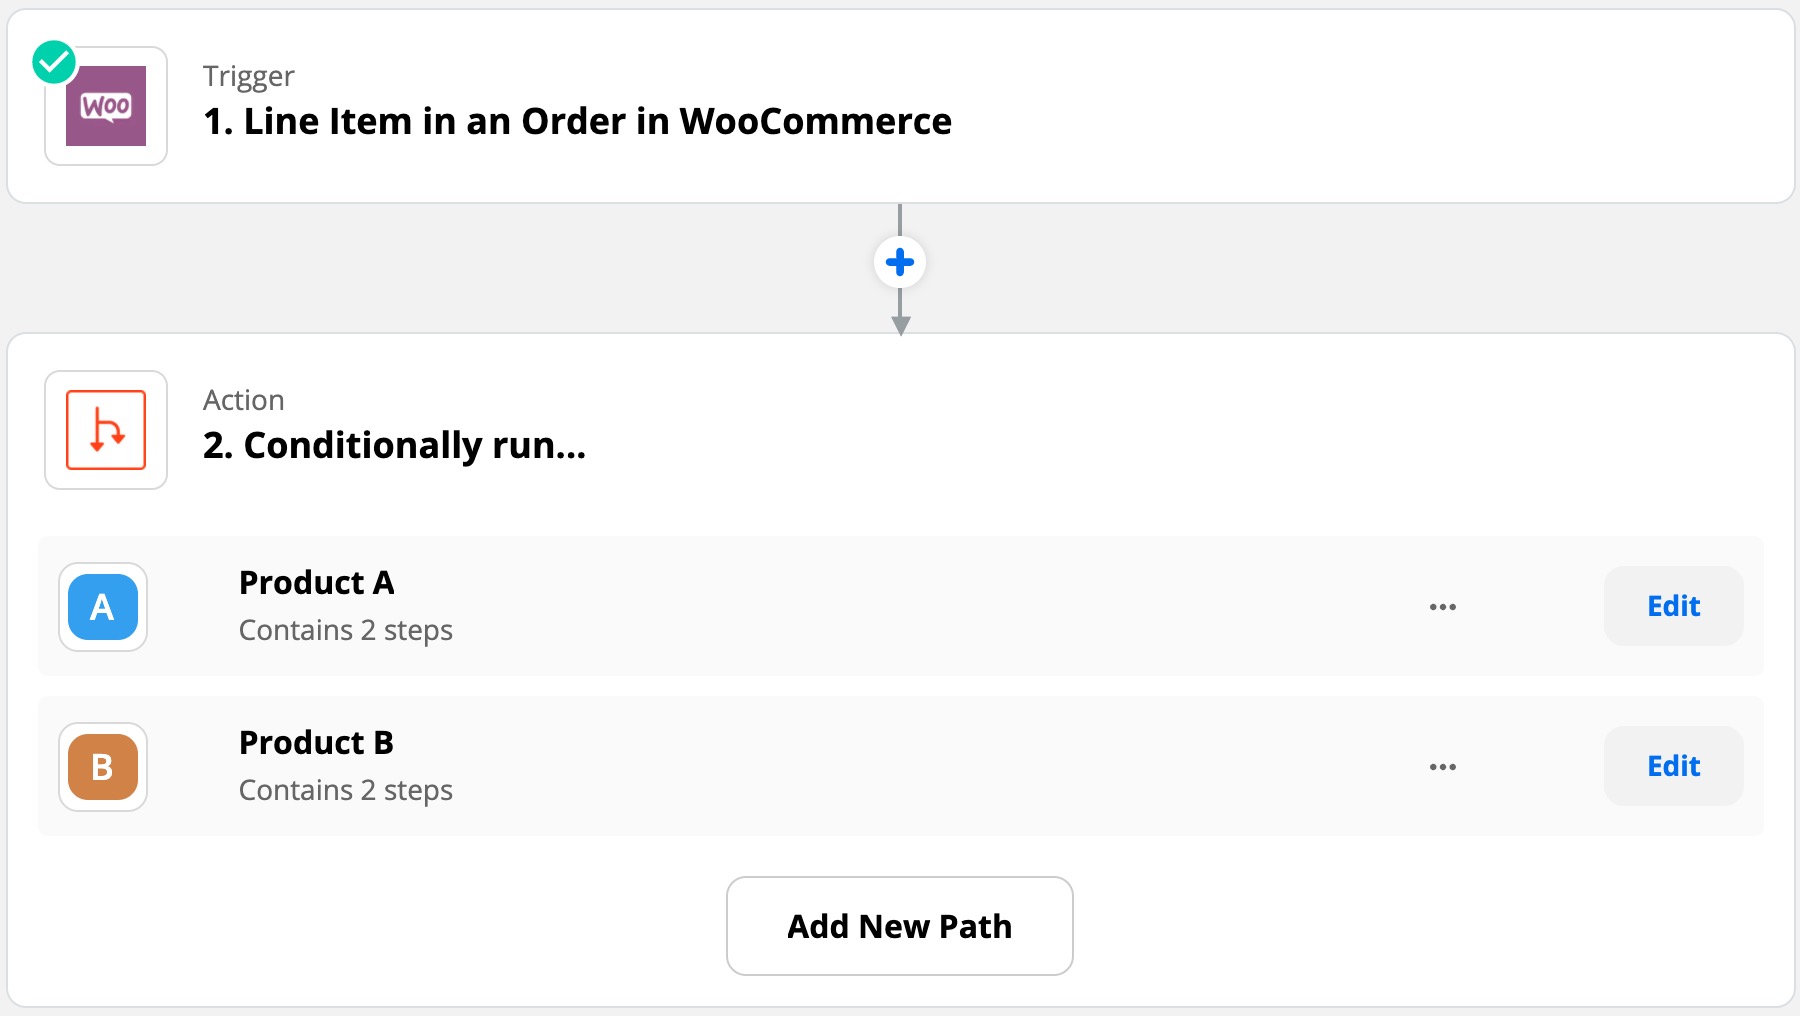
Step 1 of your Zap should be the WooCommerce app, with Line Item in an Order as the trigger. You’ll likely use the Order paid or Order created trigger rule.
Step 2 of your Zap should be either a Paths by Zapier or Filter by Zapier step. Step 2 is where the conditional logic is added to only act on a specific product.
For example, using a Paths by Zapier step, you can set up several paths for different products in your store, which would look something like this:
For each path configuration, you would set up criteria such as the following, which is based on the name of the product ordered:
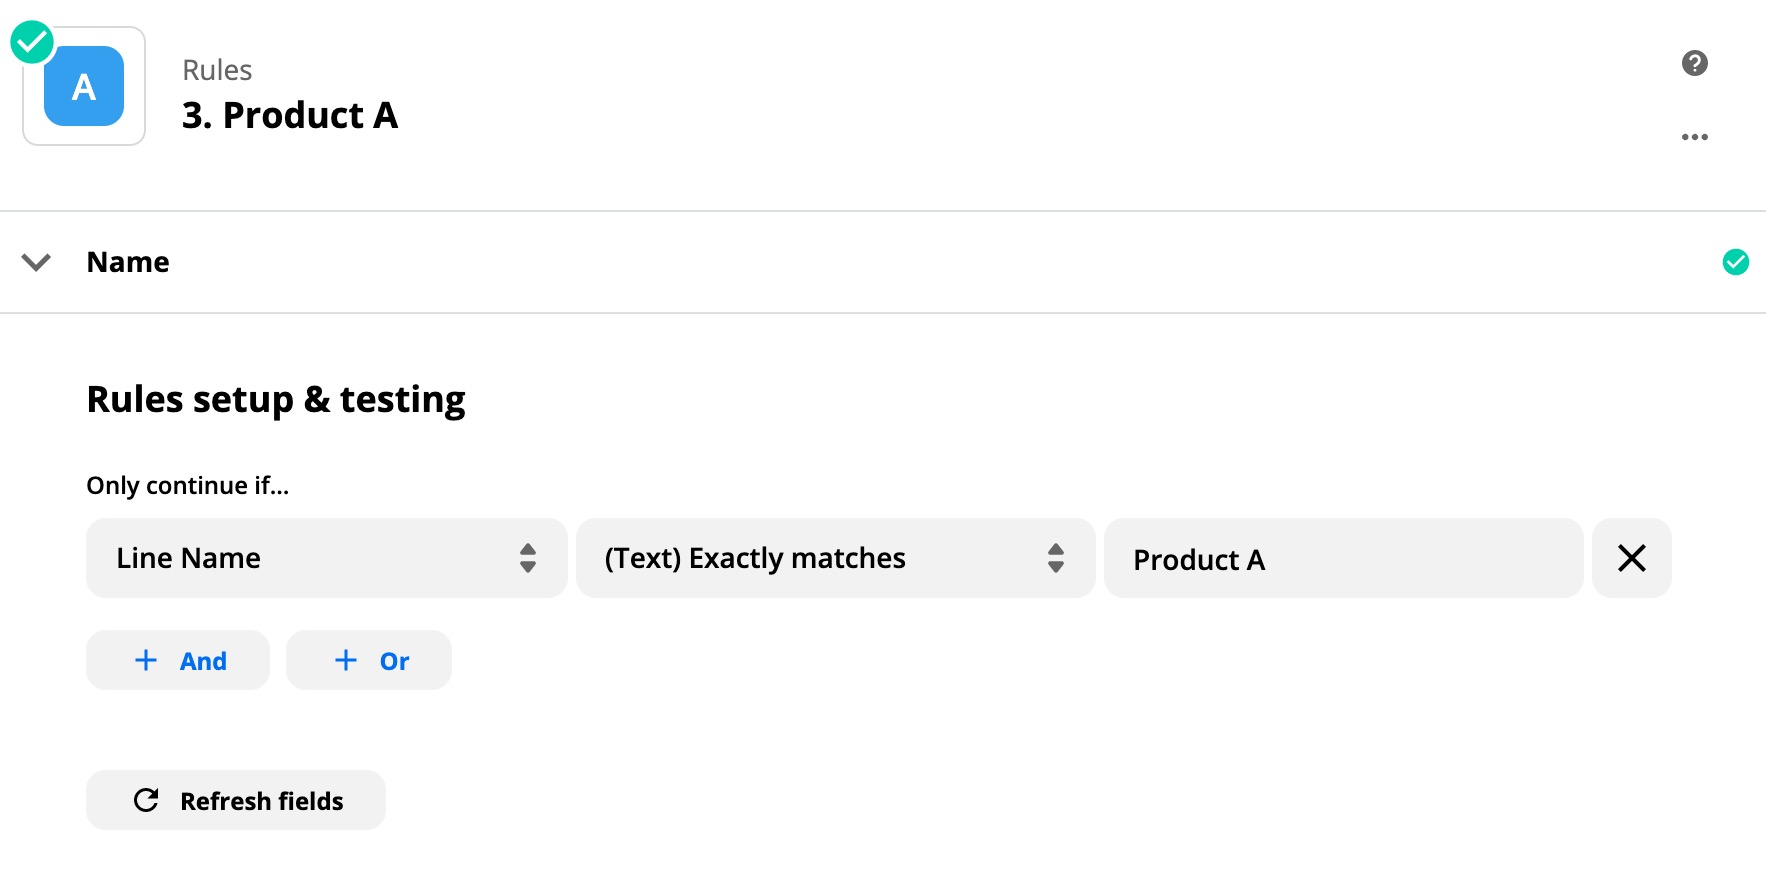
Then inside each path, you would perform your desired action.
For more details on how to use Paths in your Zaps, please see this Zapier help article.
Warning
Zapier has a limit on the number of paths (and steps) in a Zap, so if you need more paths or steps, then you will need multiple Zaps.
Task History
You can see previously sent information to Zapier on the Zapier.com Task History page.
If a task encounters a problem, it will be stopped. Zapier can distinguish between issues and will automatically stop affected task(s).
If the problem prevents not just that specific task but any later task as well, then the task will be stopped and marked as “Errored.” If repeated errors occur, then the corresponding Zap is also disabled.
Alongside the above error, Zapier can stop and mark a task as “Halted” if the problem will not prevent future tasks from being completed successfully.
For more troubleshooting tips, please consult the Troubleshoot Zaps documentation.
Tip
You can resubmit halted or errored tasks from the Zapier Task History page if you need to.
Please look at the Issues with Tasks chapter if you have any problems.
You can find more information on the Task History Help page on Zapier.com.
Existing Connection
To manage, modify, or delete existing connections, please refer to the Zapier Help’s Manage your Zaps page.
-
The name is dynamically generated based on the Resource that you selected in the Choose App & Event step. ↩↩
-
Certain Zapier features, for example, Filters, Paths and Multi-step Zaps are only available with a paid Zapier plan. For pricing information, please refer to the Zapier’s Plans & Pricing page. ↩↩
-
Only available if the Coupon functionality is enabled in your WooCommerce store. (Enabled by default). ↩
-
Only available as a trigger. ↩
-
Only available if the Woo Subscriptions plugin is installed. ↩