Guide for New Users
WooCommerce Zapier offers seamless integration with over 6,000 cloud apps and services via the Zapier web automation service.
With this integration, you can automate tasks, synchronise data efficiently, and connect with the tools essential to your business. By reducing manual effort, WooCommerce Zapier streamlines your processes, enhancing efficiency and setting the stage for growth. Embrace the intelligent, scalable, and automated solutions WooCommerce Zapier provides to elevate your online store.
Supports more than 70 triggers across 10 resources:
- You can send your WooCommerce Order, Order Note, Product, Customer, Coupon, Booking1, Membership Plan2, User Membership2, Subscription3, and Subscription Note3 data via triggers to 6000+ Zapier-enabled apps.
Supports more than 20 actions:
- You can use Zapier to create Order, Order Note, Product, Customer, Coupon, User Membership2, Subscription3 or Subscription Note3 data from a Zap.
- You can use Zapier to find existing Order, Order Note, Product, Customer, Coupon, Membership Plan2, User Membership2, Subscription3 or Subscription Note3 data from a Zap.
- You can use Zapier to update existing Order, Product, Customer, Coupon, User Membership or Subscription3 data from a Zap.
Tip
The actual fields and data can vary depending on the WordPress and WooCommerce versions installed and by installed plugins and settings. If you are using an Actions template, please refresh the fields to make sure everything is updated to match your store.
Features
This powerful tool offers two-way integration that supports ten distinct WooCommerce resources—including Orders, Order Notes, Products, Customers, Coupons, Bookings1, Membership Plans2, User Memberships2, Subscriptions3, and Subscription Notes3.
To automate your workflows, you can use more than 70 outgoing connections, known as “Trigger Rules,” and over 20 incoming connections, known as “Actions.” These allow you to integrate and update your WooCommerce data seamlessly.
Installation
After Installing the WooCommerce Zapier Extension for the first time, you will be prompted with the following message:

From then on, everything else is handled in the zapier.com interface.
Creating your first Zap
Tip
If you haven’t created a Zap before, please refer to Zapier’s key concepts article before proceeding.
The simplest way to get started is to create a Zap using one of the Zap templates, as it is typically quicker than hand-crafting your own Zap from scratch.
For detailed instructions on creating your first Zap with WooCommerce, please refer to the Make a Zap instructions.
Create a Connection
To create a connection you don’t need to jump around multiple screens or create authentication between Zapier and WooCommerce manually. Everything is provided seamlessly for you by the integration.
Authenticate
When you create your first WooCommerce Zap, you will be asked to choose your WooCommerce account.
The authentication process involves the Zapier.com service connecting to your WooCommerce store using your WordPress administrator username and password.
Please ensure you complete the authentication dialogue window correctly:
- In the WordPress Site Address (URL) field, enter the URL to your WordPress website’s home (front) page. Be sure the URL starts with
https://and does not include the trailing slash.
For example:https://example.com
If in doubt, go to the WordPress Dashboard → Side Menu → Settings → General screen and copy the Site Address (URL) field value and paste it into the WordPress Site Address (URL) field in the authentication dialogue window. - In the WordPress Username field, enter your administrator username or email address that you use when logging into the WordPress dashboard.
-
In the WordPress Application Password field, create an Application Password for your WordPress administrator account, and enter it here.
Use a WordPress Application Password
Using an application password (rather than your regular password) improves compatibility with security-related plugins and services. See details in the Security Plugins chapter.
To set up an Application Password, go to WordPress Dashboard → Side Menu → Users → Profile screen and press the “Add New Application Password” button. Please see here for details.
Can’t see the Application Passwords settings in WordPress? Please see here for suggestions.
Alternatively, if you are unable to create an Application Password, you can use your regular WordPress password.
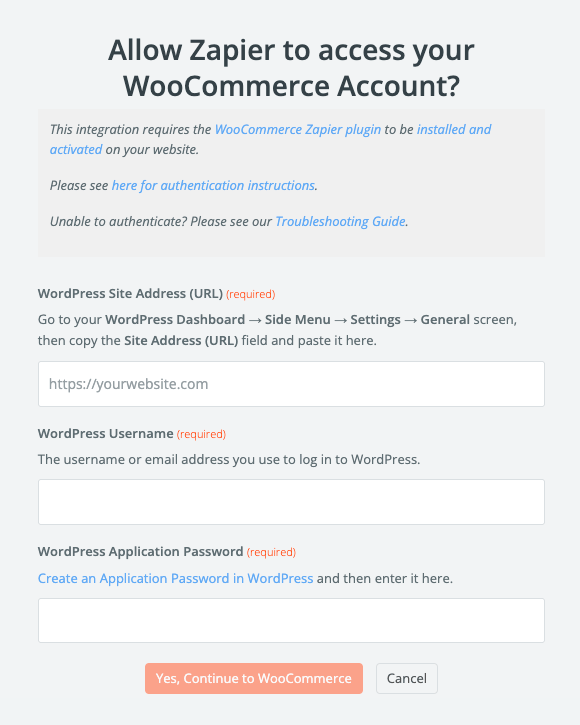
Click the Yes, Continue button to complete the process.
Trigger
Here is a high-level overview for creating a Trigger (an outgoing connection from WooCommerce to Zapier):
- Create a new Zap in Zapier.
- Choose WooCommerce as the app, and choose the Resource.
- Authenticate Zapier into WooCommerce. See above.
- Test the connection.
- Choose one of the 6000+ third-party service integrations as your Action.
- Turn on your Zap.
For detailed information, refer to the Create a Trigger chapter in the User Guide.
Action
Here is a high-level overview for creating an Action (incoming connection to WooCommerce):
- Create a new Zap in Zapier.
- Choose one of the 6000+ third-party service integrations as your Trigger.
- In the Action step, Choose WooCommerce as the app, and choose an Action.
- Authenticate Zapier into WooCommerce. See above.
- Fill the Input Fields with the incoming data.
- Turn on your Zap.
For detailed information, refer to the Create an Action chapter in the User Guide.
Integration Features
To help keep track of what is happening in your WooCommerce store, the plugin provides various information on your WooCommerce admin screens.
The most important is a Task History screen, which informs you about what communications happened between your store and Zapier in the last 30 days.
Historical information is also available for every resource in the Resource History block.
Troubleshooting Helpers
In case of a problem, there is are detailed Los available, as well as an extensive Troubleshooting guide.
Next Steps
Please read the whole User Guide for more information. Especially the Usage and the Plugin Interface chapters to familiarise yourself with the integration capabilities.
You can also find detailed information for Trigger Rules and Actions. There are also detailed Field Definitions for each Resource to explain what data will be transferred between WooCommerce and Zapier.